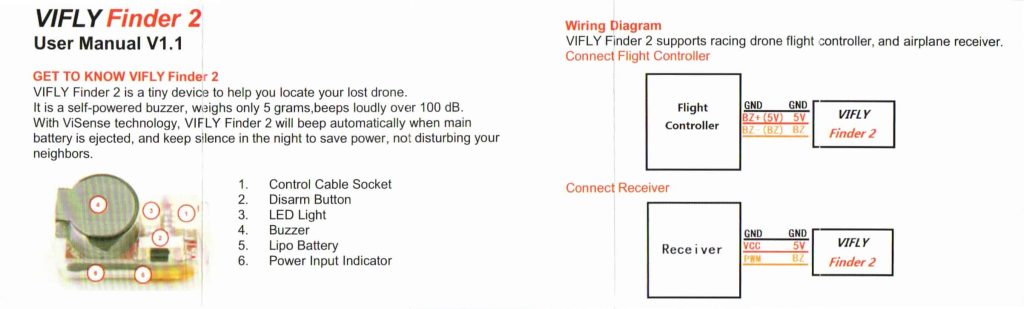
How Does The VIFLY Finder 2 Work?
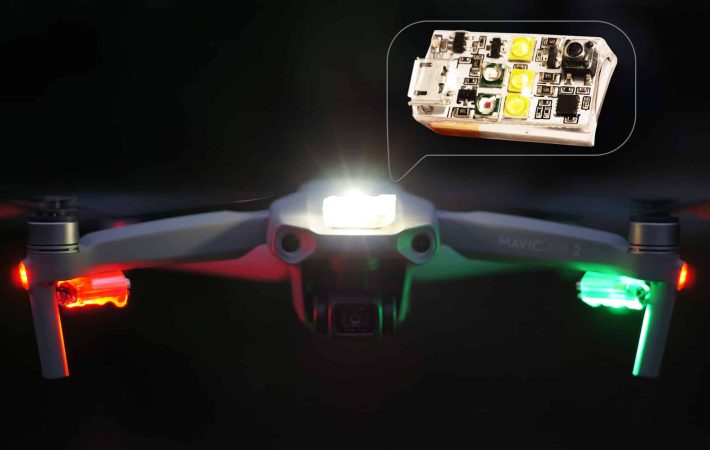
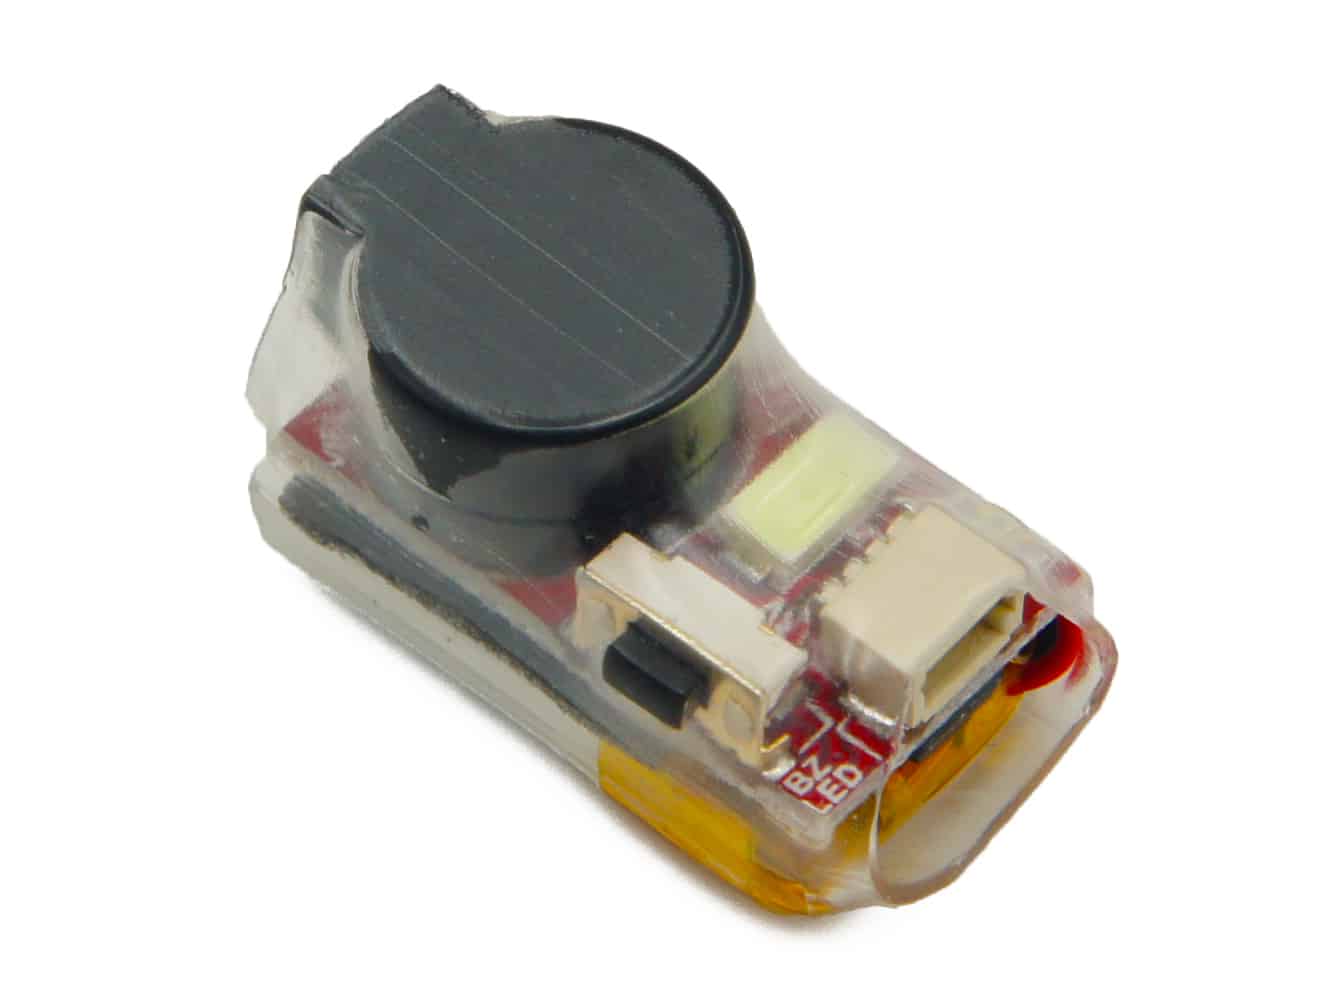
The VIFLY Finder 2 is a buzzer or beeper designed to assist FPV Drone pilots in locating lost or crashed aircraft. It works by emitting a loud beeping sound and flashing an LED light to make it easier to locate your FPV drone if it crashes or you land it somewhere difficult to find.
The Finder 2 must be installed onto your FPV drone or fixed wing plane by soldering the black, red and yellow wires onto either a flight controller or receiver. Once you do this, you need to set up the proper switches in a configurator program such as Betaflight, and then you can use it as both a very loud beeper and drone finding device if you crash or land in a place that is difficult to find your drone.
Who Should Buy The VIFLY Finder 2?
The VIFLY Finder 2 is a useful device for anyone who flies FPV Drones in areas with lots of obstacles or difficult terrain where the drone can potentially become lost or difficult to find. You will need to have basic skills to solder the device onto your flight controller or receiver, as well as a fundamental understanding of how to set the device up on your radio and in the configurator software for the drone’s flight controller. This is the ultimate package for dedicated FPV Drone enthusiasts who want an economical way of finding their drones as well as a layer of insurance knowing that if they do crash their drone, they will have hours to walk around and listen to the beeping or look for the LED light if the drone crashed in a dark place or during nighttime operations.
What Is The Difference Between The VIFLY Beacon and VIFLY Finder 2?
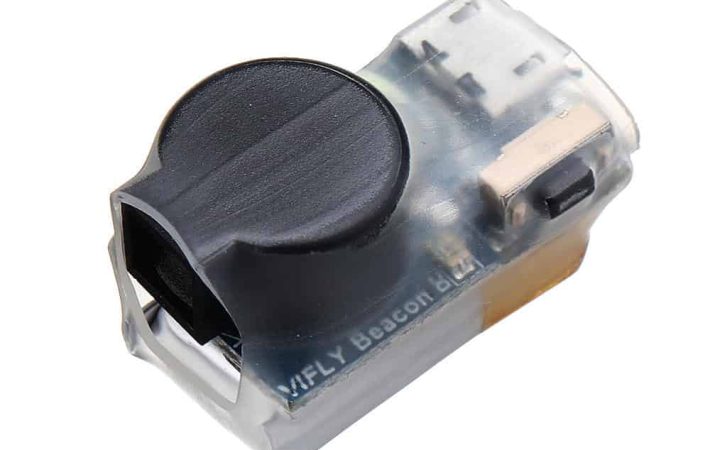
The difference between the VIFLY Beacon and VIFLY Finder 2 is in how it is charged, installed, and triggered. The Beacon is wireless and has a Micro-USB port to charge the 80 mAh battery with. The Finder 2 does not have a USB port and charges by pulling energy from the battery that you plug into your drone to fly with.
The Finder 2 behaves similarly to the Beacon when it crashes, but the extra feature you get with this one is that you can also use the Finder 2 as a manually activated beeper for your drone. You will not crash your drone in a super difficult to find place every time, but you will crash your drone in hard to see places often especially if you fly in less civilized areas like the great outdoors. A small pile of leaves or brush can quickly camouflage your FPV Drone and leave you wondering aimlessly trying to find it. If you flip your beeper switch, the Finder 2 will be turned on and you will be greeted with a 105 db beep that will very quickly allow you to find your drone.
The last difference, and perhaps the most important to note, is that you will need to solder your Finder 2 to either the receiver or flight controller on your FPV Drone. On top of this, you will need to understand how to set up a beeper in your configurator software such as Betaflight and map the channel to your radio.
How Long Does The Battery Last On The VIFLY Finder 2?
The VIFLY Finder 2 comes with an 80 mAh battery which will last up to 30 hours during a crash situation. This means you will have just over a day to find your FPV Drone if you had a fully charged battery in good working condition. Good working condition means you did not leave your Finder 2 discharged for months on end or fully charged as well (you did not use it). As long as you fly frequently, your Finder 2’s battery will maintain itself quite well due to the fact that it charges by pulling energy from the main drone battery as you are flying, but if you have not flown in a while you might want to fly a few packs close by while it gathers a charge.
How To Turn On The VIFLY Finder 2?
In order to turn the Finder 2 on, you will need to provide power to your FPV drone first. Once your main battery for your drone is connected the Finder 2 will detect it and turn on. You can then flip the switch which you already configured using your radio and configurator program of choice to turn the beeper on manually.
The automatic alarm will be triggered if the main battery to your drone is disconnected, runs out of power, or you crash. The beeping will commence once any of these situations are detected by the Finder 2, and if it is dark you will notice an LED light begins to flash as well to aid in finding your lost aircraft.
How Do You Activate The Alarm On The VIFLY Finder 2?
The alarm can be activated in 2 ways: manually and automatically. To activate the alarm manually, you need to configure a switch for this specific action on your radio and program it on your drone’s flight controller using a configurator program like Betaflight. Once this is done, you can simply power on the Finder 2 by connecting a battery to your drone and then flipping the switch which you configured on your radio.
To activate the alarm automatically, your drone needs to lose power or have the battery disconnected to stop the power flowing to the Finder 2. You can also activate the alarm automatically when you crash your drone, the Finder 2 does a great job at sensing a crash which will then put the Finder 2 in the automatic alarm state to help you find the drone.
How Does The Automatic Alarm Work On The VIFLY Finder 2?
The automatic alarm on the VIFLY Finder 2 works by sensing a loss of power or crash, or both. When you crash a drone, there is a chance your battery gets disconnected and ejected from the drone. This causes the Finder 2 to lose its power source which then triggers the system within the Finder 2 to begin the automatic alarm process. The same thing happens when the Finder 2 detects a crash has occurred with your FPV drone.
In both of these scenarios, the Finder 2 begins its automatic alarm process to aid in finding your FPV drone, and if the Finder 2 detects little to no light, it will also flash a bright LED to help you find it in dark places or during nighttime operations.
How To Disarm The VIFLY Finder 2
There are two ways to disarm the Finder 2:
- Disarm With Button
- Disconnect the main battery of your FPV drone, hold the button on the Finder 2 for anywhere between 1 and 5 seconds and then release it.
- Disarm With Main Battery
- Disconnect your drone’s main battery, reconnect the same battery for anywhere between 3 and 6 seconds, and then disconnect it again.
How Do You Charge The VIFLY Finder 2?
The Finder 2 does not need to be charged manually. You can simply ensure that you wired it properly to your drone and then fly your drone as desired. While in flight, the Finder 2 pulls tiny amounts of power from your drone’s battery to charge itself with. The time it takes for the Finder 2 to charge fully is approximately 90 minutes (1.5 hours), so if your average flight with your FPV drone is 5 minutes, you can expect to charge the drone with 18 5 minute flights.
Does The VIFLY Finder 2 Beep At Night?
Yes, the Finder 2 from VIFLY will beep at night if you crashed your drone or the Finder 2 has sensed a crash. Otherwise, it will not beep all night to avoid annoying nearby people during the entire night.
How To Install The VIFLY Finder 2
Installing the Finder 2 from VIFLY is not as difficult as it might seem initially, but it does require some understanding of how FPV drones work and where to find the necessary information for your specific flight controller or receiver that you are looking to install it on. The best way to find this information is by using the manufacturer’s website after you identified which hardware you’re working with.
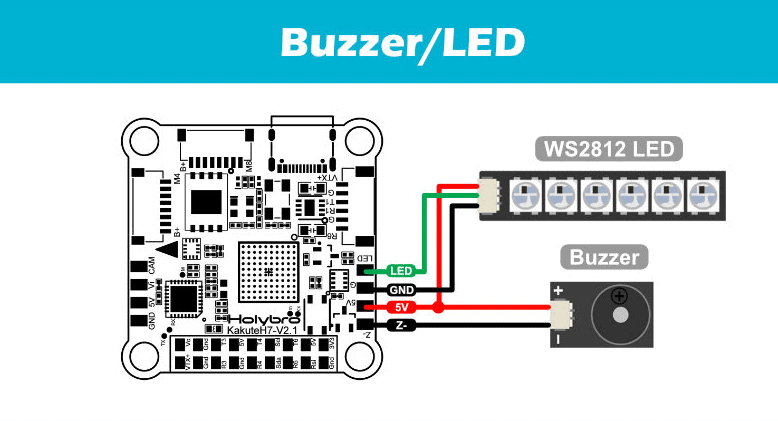
The picture above was taken from a diagram that belongs to the Holybro Kakute H7 V2 flight controller. As you can see, there are designated solder pads on the FC which are specifically for LEDs and buzzers. Since the Finder 2 has both a buzzer AND LED, you get both with just one device. In this situation, if we take a look at the manual included with the Finder 2, we can see how we would wire the device onto the Holybro Kakute H7 V2.
The Finder 2 GND (black) wire will go to the solder pad labeled GND on the flight controller. The BZ+ (red) wire will go to the pad labeled 5V on the flight controller. The BZ- (yellow) wire will go to the pad labeled Z- on the flight controller.
Once you have successfully soldered the wires, you can move to the next step which is setting up the switch in Betaflight.
How To Set Up The VIFLY Finder 2 In Betaflight
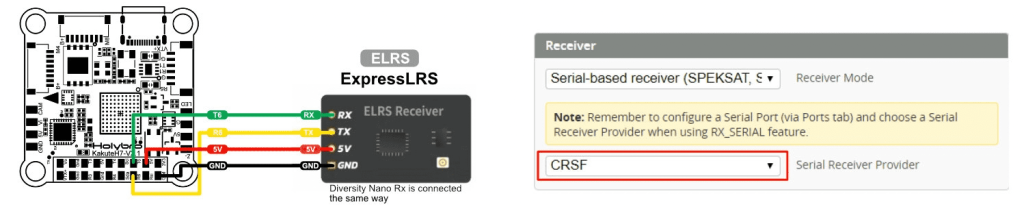
Setting up the VIFLY Finder 2 in Betaflight is pretty straightforward as well once you understand the fundamentals. The process we describe will walk you through what you need to do if you are installing the Finder 2 on a custom built drone, but you can pick up at step number # if you have a RTF (Ready to Fly) or BnF (Bind and Fly) drone. If you have an ELRS receiver, you will need to have ExpressLRS Configurator installed if you have not connected your radio (transmitter) to your drone (receiver). You will also need your configurator software of choice for your actual flight controller which is more than likely going to be Betaflight Configurator.
Steps to Install The VIFLY Finder 2:
- Solder the GND (black), BZ+ (red), and BZ- (yellow) wires to your Flight Controller.
- Be sure to look up the wiring diagram on the flight controller manufacturer’s website so you know where the solder pads are located on your specific flight controller.
- Ensure your drone has been bound to your radio and there is connectivity between the two
- If you are building a custom drone, you will have to flash your receiver if necessary before you can successfully bind your radio (transmitter) to your drone (receiver).
- Choose a button or switch on your radio (transmitter) which you want to designate as your beeper switch/button
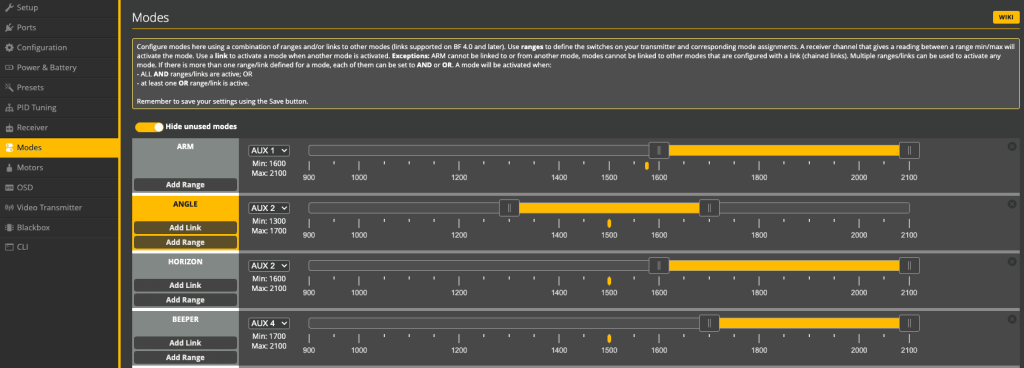
- Connect your flight controller/drone to Betaflight (or whichever configurator program you use) and go to the Modes tab.
- You will need to ensure the BEEPER range is enabled, and then you will assign your specified button/switch to that range. If you don’t know which AUX number your button is, click auto and press or flip the button/switch you want to use for your BEEPER range.
- Make sure to save your configuration and disconnect your drone/flight controller from Betaflight.
- Power up your drone, wait for the connectivity to be established from your radio (transmitter) to your drone (receiver), and flip or press your beeper button to test out your switch.
- If your switch is not working, you will have to go back through all of the steps and figure out where you misconfigured, improperly wired, or incorrectly installed something.
- Verify your wiring is correct from your receiver to flight controller if you built the drone, ensure the correct ports are configured as per the flight controller diagrams, check to ensure you selected the correct radio button or switch, make sure your drone is actually bound to your radio.
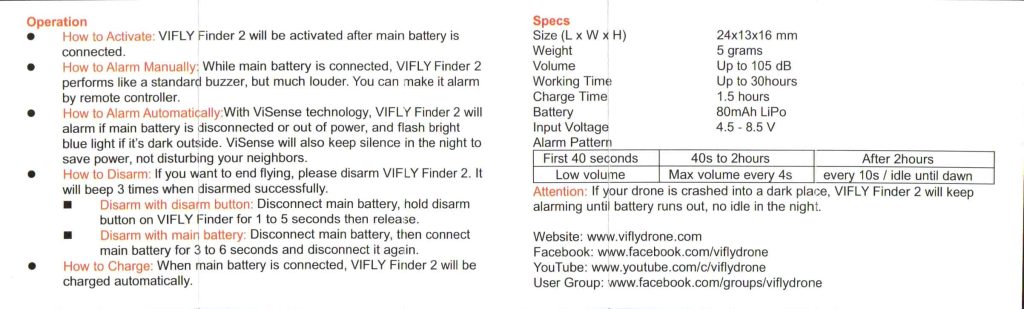
VIFLY Finder 2 Specifications
| Size (L x W x H) | 24mm x 13mm x 16mm |
| Weight | 5 Grams |
| Volume | Up To 105 dB |
| Working Time | Up To 30 Hours |
| Charge Time | 90 Minutes (1.5 Hours) |
| Battery | 80 mAh |
VIFLY Finder 2 Manual