Learning To Factory Reset Your Drone Takes Time
Welcome to FPV, you have chosen a painfully difficult hobby. There are various skills that make up this hobby, and any one of them can be difficult, but in FPV they are all combined into one painful headache for beginners. Learning to factory reset your drone is no easy task, but if you go through this guide you will learn the fundamentals, and eventually you will master it and know FPV drones very well.
If you take the easy route, you will only end up more frustrated and spending more time to learn the same information. Due to this fact, we recommend that you start on this journey knowing it will take time to learn all of the information we have compiled for you.
Getting frustrated is inevitable, so if you get frustrated just stop and come back later: frustration will rarely solve the problem, but it will often make it way worse. Taking a break can also allow you to see the problem differently or come up with a different and better solution than what you were eagerly trying to make work earlier.
Take it one step at a time, if you try to get to the end of this tutorial you will miss key information that will probably haunt you for hours upon hours in the future.
Understand your drone, its components, and which things you will need to reset. Once you have that figured out you can start making progress. We have examples at the bottom of this post which will walk you through how this process works with several popular drones.
Once you figure everything out and your drone is working again, learn how to back up your drone and radio so you never deal with this again. One thing that is never discussed in FPV drones is the system of steps or processes a pilot should take before even flying the drone such as backing up the CLI Dump.
Instead of piece parting your drone back to the factory defaults, you can simply install the correct firmware and CLI Dump, re-bind and fly! Don’t spend countless hours trying to figure out which button you changed or which setting ruined your drone, just execute the CLI Dump from the manufacturer and get back in the air! This will only work if you did not heavily customize your drone, because if you did you should already know how to reset your drone.
Back up your CLI Dump in a folder or location on your computer which you will remember in the future. Give the file a good name that is easily recognizable and explains exactly which drone the CLI Dump is for.
Note which firmware your drone uses after you finish this walkthrough, or better yet download the HEX file and store it with your CLI Dump so you have readily available factory settings and can do this entire guide in 10 minutes if you need to in the future.
This Guide Is for BnF (Bind and Fly) and RTF (Ready To Fly) FPV Drones
If you have a custom built drone, you won’t be able to find a CLI Dump or firmware version from the manufacturer, because YOU ARE the manufacturer. Unless you backup your CLI Dump and Firmware HEX file, you will have to start from scratch, but this guide can be useful as well for generic purposes and understanding how your drone works with the different components both hard and software.
This guide is NOT for DJI drones!
If you are following this guide for the purposes of factory resetting your custom built drone, you will need to find the manuals, diagrams, and any other documentation for the following:
- Flight Controller
- Receiver
In order to find that information, you will need to remember exactly what it was your purchased and then head over to their website to retrieve those files. Due to the infinite possibilities of different configurations, that is all the information we can provide without confusing you further. Simply go and find the manual and diagrams for your FC and receiver.
What Are The Components of An FPV Drone?
Flight Controller: This is often described as the brains of the FPV drone. The FC (Flight Controller) is what crunches all the numbers and does all the math and calculations required to keep your drone in the air. Remember this: The FC is where your firmware is installed. You can tell which component the FC by simply seeing where the USB port is. There is always a USB port soldered onto your flight controller.
Receiver: The receiver is a small board that is soldered to the FC. The receiver will “speak” in a certain protocol like FrSKY, Futaba, Spektrum, TBS Crossfire, ELRS, etc. The receiver takes the instructions from your radio (what you hold in your hands to fly the drone) and passes them to the flight controller for processing. Receivers also come with binding buttons which allow you to connect or bind your radio and drone, although it’s really just your radio binding to the receiver on your drone. The “drone” is just a bunch of electronics soldered together that can understand and calculate a lot of complex things!
VTX (Video Transmitter): The VTX is what your drone uses to send out the video signal for receiving equipment to consume, process, and display the feed. Your FPV Goggles are the receiving equipment in this scenario, and the VTX is simply an electronic board or chip that processes the image from the camera on your drone and sends it out wirelessly through a specific frequency. You will not need to do anything with the VTX to reset the settings on your drone, but you will likely need to change the band and channel to whatever you prefer using if you changed it from the factory defaults.
ESC (Electronic Speed Controller): The ESC is where your battery plugs in for power distribution to the FC and motors as well as other electronics as needed. You will not need to do anything with the ESC if you are resetting the FC settings through CLI Dump and/or firmware updates/corrections.
Radio: While the radio is not a part or component of the drone itself, it is part of the entire FPV system. The radio is what you hold in your hands to send out the transmissions or instructions to your drone. The radio is mentioned in this documentation because there is a chance you will also need to reset the radio, but that component will not be covered in this blog post.
Files Needed To Factory Reset Your FPV Drone
Firmware HEX/file
This is the programming which goes on your flight controller and is stored in memory that does not get affected when the FC (drone) is turned off or loses power (non-volatile).
In other words, this is the program running the drone and it needs a specific version to fly with the hardware (flight controller) that your drone has.
You would update the firmware to fix bugs or get new features BUT the golden rule of FPV drones is “Do not update simply for the sake of updating”. These are not phones or computers which are mass produced and well tested before new versions roll out. If you update or change the firmware and do not understand what you are doing, you will break your drone and it will be useless until you reinstall the correct firmware and version.
The firmware HEX files can be found on the manufacturer’s websites by doing a simple search or finding their support/downloadables section.
CLI Dump
Now that you understand the basics of firmware, let’s discuss the CLI dump which can be saved to a file or copied to a notepad.
If the firmware is like the operating system on a phone, then the CLI dump is a long piece of text that shows you what all the settings and configurations are in that specific phone (background, display settings, customizations, etc).
Translation into FPV terms: The CLI Dump is a long text file with all the settings that your drone currently has enabled or configured. (Beeper, modes, OSD, rates, etc)
The CLI dump is actually the only thing you would NEED if you did not change the firmware version, so upon executing the text or uploading the CLI Dump file into the CLI tab and executing you would theoretically have reset your FPV drone to factory settings IF the settings were provided by the factory.
It is recommended that you back up your radio’s settings just the same as your drone’s, but again that is not covered in this blog post. If you would like us to create a blog post on this topic, leave a comment and or send us an email to info@volaertus.com with your request for a video.
Learn How To Find The Files You Need To Reset Your FPV Drone
Finding all of this information will heavily revolve around navigating the manufacturer’s website and documentation or downloads.
The reason this post is mainly geared towards BnF and RTF drones or kits is because manufacturers will almost always have the CLI Dump and firmware files on their website for this exact reason.
If you built your own drone, then you are starting from scratch once again unless you backed up your CLI dump because you are the manufacturer in this case.
If you did not back up your files for your custom drone, start from scratch by finding the set up documentation or manual on your flight controller manufacturer’s website.
What do we mean by “Learn how to find the files”? If you have an iFlight drone, go to iFlight’s website. If you have a GEPRC drone, go to GEPRC’s website. If you have X brand drone, go to X website.
Firmware
When finding the firmware, you will be looking for a HEX file. In other words, this is a file on the manufacturer’s website which ends in .hex.
BEFORE you start digging around for the firmware, you need to find which Flight Controller your drone uses, and you should also understand that updates are made to drones so if your drone is ancient this task will prove to be much more difficult.
If you have an idea on the version or model year of your drone you should be able to easily find what you need.
CLI Dump
Even though the CLI dump is created in Betaflight by typing “dump” in the CLI tab, manufacturers also have this as a downloadable file on their websites. This is because you need these settings to have your specific drone work as it should.
This file will almost always be a TXT file which ends in .txt. This is basically a very long notepad file with all of your drone’s settings as they were configured by the manufacturer.
Download the file and copy/paste or upload into the CLI tab in Betaflight
Install the necessary programs/software
Betaflight/INAV/Etc
Betaflight is the most popular by far, and you will likely be using this software. This is the yellow program with the bee icon. If you do not know how to install this program, we have a guide for Mac OS here, but it is practically the same process for Windows since the only difference is the error you get on Mac OS.
You can find the configurator program here: https://github.com/betaflight/betaflight-configurator/releases/
Once you have this installed, you will need to have a USB cable to connect your drone with. Not all USB cables are made the same, and nowadays with phones being as popular as they are many USB cables are only capable to passing power through, NOT DATA. You will need a USB cable which is capable of both power AND data to configure your drone with Betaflight.
Steps In Order To Reset FPV Drone To Factory Settings

- Firmware
- First, you will flash your flight controller with the correct firmware. This is ONLY if you mistakenly flashed your flight controller with the wrong firmware. If you did not do this, and you only messed around with the settings in Betaflight, then you will skip this step.
- You can verify if you have the correct firmware by finding the firmware on the manufacturer’s website, whether you have a BnF or custom-built drone, and verifying the “target” is set correctly in Betaflight for your drone when you connect your flight controller
- Once you either flash the correct firmware, or verify that the firmware is correct, you can move onto the next step: CLI Dump.
- CLI Dump
- The CLI Dump step is where you “factory reset” your drone’s settings. You will take your CLI Dump file and upload it into the CLI Tab of Betaflight. Notice I am saying Betaflight, and not BETAFPV Configurator. The names can be confusing. Betaflight is the yellow program with bee icon, BETAFPV configurator is the blue program.
- Upload your CLI Dump into the CLI tab of Betaflight and click execute to reset your drone to factory settings.
- Once this is done, hit save and disconnect to reboot the drone
- You may now move onto the final step of resetting your drone to factory settings: Binding
- Binding
- This step should be self-explanatory since you have likely flown your drone in the past and successfully bound it to your radio.
- If you have an ELRS receiver, you will need to make sure you have the correct binding phrase if you are using one.
- You can use the command bind_rx to put your drone in binding mode and then complete the binding process by putting your radio in binding mode as well.
Examples With Popular Drones
Now that we’ve discussed the how and why, we will walk through a few examples with some popular drones so you can see what the process looks like. We will assume nothing for this section, so there might be a lot of explanations in the first example. Once we do the first example, the two others will be a lot less complex, but we will provide links to the resources we have found so you can find them yourself if you find yourself having the same drone.
BETAFPV Cetus X (ELRS)
Finding the Firmware and CLI Dump
First, we go to the manufacturer’s website: https://betafpv.com/
Next, we need to find the section where we are most likely to find the firmware for the Cetus X.
In this case, we are going to start by looking at the Cetus X product page: https://betafpv.com/collections/cetus-series/products/cetus-x-brushless-quadcopter

If we scroll down, we will find the specifications for this drone. In this situation, we are looking for the flight controller that the drone uses because we need to find the correct firmware for the flight controller and to do so we need to know which flight controller we have onboard. As you can see the by picture, the Cetus X uses the F4 1S 12A FC (Betaflight) Flight Controller.
The name of the FC is also a hyperlink to the product page for the FC which you can find here: https://betafpv.com/collections/expresslrs-series/products/f4-1s-12a-flight-controller
Now that we know which flight controller our drone uses, we can move forward knowing we have the correct information. We will now find the firmware file (hex).

Scrolling down on the FC product page, we see a section called “Betaflight Firmware and CLI”. This is exactly what we are looking for. The link to download the firmware and CLI leads to: https://support.betafpv.com/hc/en-us/articles/9436686257945
Once we make it to the firmware and CLI page, we have completed the most difficult part of this process which is finding the correct firmware and CLI dump.

In this page, we will simply find the firmware and CLI dump for our flight controller. We have the ELRS version of the Cetus X, so we need the ELRS V2.2 (at the time of writing this post) firmware for our drone.
BETAFPV did not list the CLI for the ELRS version specifically here, so we will have to look elsewhere for it. Only the CLI Dump for FrSKY is listed, and we will need a different CLI Dump since we have ELRS.

Looking at the navigation section of the page, we see that we are currently in BETAFPV Support Center > CLI of Quadcopters > Betaflight FC
We can navigate back to CLI of quadcopters to find a list (hopefully) of CLI documents for other drones or other versions of the Cetus X.

After scrolling for a bit down the page we see Cetus Series and CLI for Cetus X right under it. This is the page we are taken to after clicking the link: https://support.betafpv.com/hc/en-us/articles/9436959532825-CLI-for-Cetus-X

Now that we have found the CLI dump file for the Cetus X, we can jump on Betaflight to finish the process.

Once you get Betaflight opened up, you will want to stay on the main page and go to the Firmware Flasher tab. Here you will see two options on the bottom right corner, Load Firmware ONLINE and LOCAL. We want to use the LOCAL option.

When you click Load Firmware [Local], you will see a window pop up. Here you will find the firmware that you downloaded and then you will select open.

Now that you have loaded your firmware, the Flash Firmware button will light up. Once you click this button, your drone’s flight controller will be flashed with the firmware you provided.
Once this is done, we will disconnect and reconnect the drone physically via the USB cable to restart everything with the new firmware.
Now we will connect into the actual Betaflight configurator part of the program, you will know you are in the correct window when you see all the tabs starting from Setup down to CLI.

We will head down to the CLI tab. Here you will see the same style of yellow buttons as the last section, but this time they will read like the following picture.

We will be using our CLI dump in this part of the tutorial, so to start you will select Load from file.
Once again, you will see a window pop up and you will find your CLI Dump for the Cetus X wherever you downloaded it to.
After you select your CLI Dump file, Betaflight will open a new window showing you the contents of the CLI dump file. You will have the option to Execute. Click the execute button, and you will notice that Betaflight is now populating all of the text onto your screen.

Once Betaflight is done doing its thing, you will simply type save, press enter to execute the save command, and then disconnect your drone and reconnect if it does not do it automatically.
Once this is done, your drone is considered to be factory reset. You will need to bind it to your radio again and configure whichever settings you like to configure on your drones such as modes, OSD, VTX, etc.
Congratulations!
iFlight Nazgul 5 V2
We will now take a look at another drone, but the instructions will be a lot less detailed since you can always use the Cetus X as an example for step by step instructions.
Starting off with the Nazgul 5 V2, we know it is made by iFlight so we will head on over to their website and begin the same process: https://shop.iflight-rc.com/
After running a quick search on their website, we find the product page for the Nazgul 5 V2: https://shop.iflight-rc.com/Nazgul5-HD-6S-BNF-Pro1819

From this page, we see the flight controller onboard is the Blitz F7. We need to find the firmware and CLI for the drone now that we know which FC it uses.

After looking further on the product page for the Nazgul 5 V2, we see that they have an article on Firmware/Factory Dumps. We run a search on their support page and find the following information: https://iflightrc.freshdesk.com/support/solutions/articles/48001148115-firmware-wiring-factory-dumps

Now we know where iFlight keeps their dumps, and when we click on the google drive we find various folders and locations for the different data we might need. We drill down into the proper file by starting with “Betaflight Factory Dumps” and moving down as follows: Nazgul Series > Nazgul 5 V2 Analog > Blitz F7 version > BF 4.2.9 OR BF 4.2.11. > select your receiver version.
The path after Nazgul Series will depend on your drone, in our example we are pretending that we have the analog version with the Blitz F7 FC. Typically you can detect which board you have with Betaflight ONLY IF you have not messed up the firmware already, otherwise it will only detect the incorrect firmware/board because of the firmware you installed.

Now that you have found the CLI Dump and know which FC you have, you are prepared to do the remaining steps which involve flashing the firmware and the loading the CLI Dump text file via Betaflight and finally configuring your modes, OSD, VTX, etc.
GEPRC Cinelog 35 Performance HD
Our last example will be the GEPRC Cinelog 35 Performance HD. This series of steps will be even more simplified than the Nazgul 5, and they are as follows:
- Find your way to GEPRC’s website: https://geprc.com/
- Find your drone: https://geprc.com/product/geprc-cinelog35-performance-hd-avatar-fpv-drone/
- Find the Flight Controller it uses: https://geprc.com/product/geprc-gep-f722-45a-aio/
- Find the firmware and CLI dump on GEPRC’s website
- Firmware: Unable to find downloadable, but found the target: GEPRC_F722_AIO
- CLI: https://geprc.com/downloads/cinelog35-performance/
How To Find Your FPV Drone’s Flight Controller Firmware
There are times when manufacturers do not provided a downloadable HEX file containing your drone’s firmware. If this is the case, you will need to consult your drone’s manual to understand which firmware target you need to apply using Betaflight or whichever FPV Drone configurator software you like to use. We will run through an example for you with the GEPRC Cinelog 35 Performance HD FPV Drone.

Since we were unable to find the firmware hex file as a download, we will set the target in Betaflight. In the manual for the GEPRC Cinelog 35 Performance HD you will find the following information. As you can see, the firmware target is GEPRC_F722_AIO. With this information on hand, we will jump into Betaflight and set the target manually.
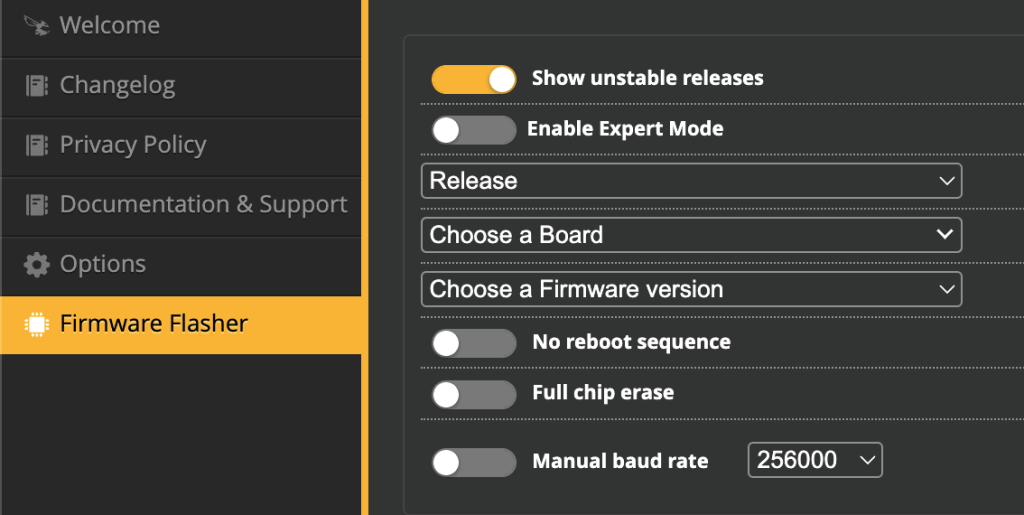
When you open up Betaflight and connect your drone, you can find the firmware flasher tab on the main page of Betaflight. If your drone connected automatically and you cannot see the correct tabs on the left, hit the disconnect button on the top-right.
In the Firmware Flasher tab you will expand the Choose a Board drop-down and type GEPRC_F722_AIO.
After you enter this information and select the board, you will see the next item which used to say Choose a Firmware version now has a list of different versions for you to choose from. This is where it gets a bit tricky, but the good thing is you can try the latest version and execute your CLI dump in the CLI tab and try it out, if you get any funky errors you can start rolling back your version one by one until you find one that works.

Once you find one that works, you will once again run your CLI Dump and bind your drone to your radio to make sure everything works as it should.
Congratulations, you have now mastered a critical skill in the painful yet extremely rewarding world of FPV drones!
How To Backup Your FPV Drone’s Configuration
Understanding this simple step will save you many headaches during your FPV drone journey. Now that you have a fully working and properly configured drone, it is a great idea to back up the settings. It’s very easy to do and will only take you a few minutes.
First, you will need to open up Betaflight and connect your drone. Once your drone connects you will go down to the CLI tab on the left.

From here, you will type the command dump and hit enter.

You will see lots of lines of text appear. Once the lines stop appearing, you will be able to hit Save to File.
Once you click on Save to File, you will be able to save the .txt file anywhere on your computer for safe keeping. If you ever find yourself in the unfortunate situation where you need to reset your drone to the settings you have today while you’re saving this configuration, you will simply come back to this tab and click on the Load from File button, choose the file you just saved, and type the save command and reboot your drone.
You cannot do the same thing with your firmware, but you can create a screenshot or notepad with the target for your flight controller and save that along with your CLI Dump in the same folder. Then, if you ever need to roll back to a known working firmware version, you can simply visit the firmware target and version that you took a screenshot of on the day you saved your CLI Dump to revert your drone to a working status.


